| Under Construction!
This page is currently in the process of being expanded on. Please note that there may be missing or incomplete information. |
| Collaborative Guide
Collaborative guides are edited by the general community based on a general focus and are works of opinion. Please use the Discussion page or the Discord if major changes are required. |

Building a Team
Team Building is the action of choosing and outfitting the four adventurers that will be sent on a quest. This is done in the "Teams" tab in the menu.
Edit Teams[ | ]
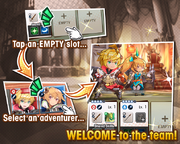
Edit Teams will allow the player to choose party members and adjust their gear. To include an adventurer, tap them and then tap the slot they will fill, and they will be placed into the active party. Whenever a team member is added to the team, they will not have any gear equipped, and they will equip their default shared skills. To equip their gear, tap the appropriate location on their info window below them, and then tap the desired item.
Team Building Considerations[ | ]
The main five components to consider when team building are:
Choosing Adventurers[ | ]
Elements
The first consideration when building a team is the core element the team should be, which will decide which adventurers and dragons to bring.
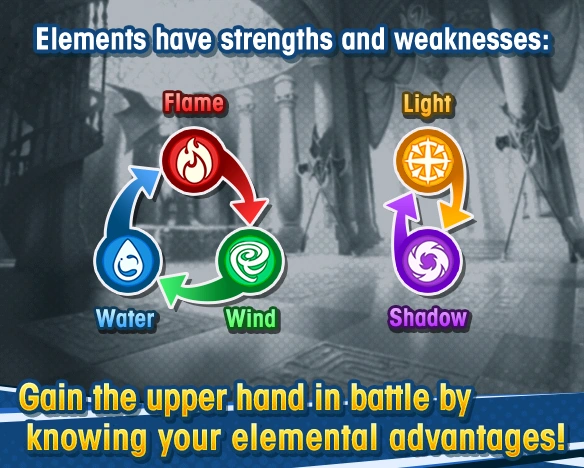
Since each quest has an attributed element that the majority of the enemies, including the boss, within the quest have, a team should usually be built to contain the element that is stronger against that element, to improve defensive capabilities and to a lesser extent, offensive capabilities. For example, a Flame quest is best tackled by a team of Water-attuned adventurers and gear, as Water-attuned adventurers enjoy a 50% damage reduction against all Flame damage, as well as 50% increased damage towards Flame enemies. However, it may not always be possible to have the resources to build a mono-element team. In this case, it is fine to bring adventurers and gear of other types (Rainbow teams), as long as the adventurers are not weak to the quest element. For example, Wind-attuned adventurers should not be used for a Flame quest.
- Some quests later on in the Main Campaign introduces off-element enemies and sometimes enemies with an elemental advantage against you. Caution is advised in this situation.
Since the player controls the first character, it is possible to just have a main character strong against the quest element to carry the AI regardless of element, especially since AI adventurers enjoy a permanent damage reduction to compensate for their worse attack-dodging capabilities.
Some adventurers may also have a niche that overrides elemental consideration.
- Exceptionally strong melee DPS like
 The Prince,
  Marth,
  Gala Mym,
  Gala Laxi, Mitsuba, and Gala Alex are valuable on most teams for their very high damage output, even outside of their element, as long as elemental disadvantages aren't at play.
 - Elisanne, Templar Hope, and Patia grant access to high amounts of unconditional strength and/or defense buffs, and in case of the lance-wielding adventurers, also provide a universal HP co-ability, and hence can make significant contributions to a team as long as elemental disadvantages aren't at play.
- Healers like Cleo, Verica, Halloween Lowen, Jiang Ziya, Hildegarde, and Grace are valuable on most teams for sustain or protection.
Additionally, players may only place one variation of each character in the game. This means, for example, that ![]() Gala Mym and
Gala Mym and ![]() Halloween Mym cannot be on the same team.
Halloween Mym cannot be on the same team.
Choosing Dragons[ | ]

Matching Adventurers with Dragons
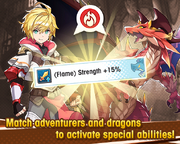
Dragons should be taken into consideration alongside adventurers. This is because if an adventurer and equipped dragon share the same element, not only does the adventurer benefit from the dragon's abilities (e.g. ![]() (Flame) Strength +40%, etc.), but sharing the same element also grants a 50% HP and strength increase to the dragon's base stats.
(Flame) Strength +40%, etc.), but sharing the same element also grants a 50% HP and strength increase to the dragon's base stats.
Thus, when selecting adventurers, a player should also take into consideration what elemental dragons are available to equip to those adventurers as well.
Similar to adventurers, exceptions may be made for niche off-element dragons.
- Mini Mids's, Mini Hildy's, Mini Zodi's, and Fatalis's abilities still function on off-element adventurers, making them pretty good choices if you need a filler dragon, as they're stronger than story dragons.
- Phoenix's and Freyja's healing skills grant an extremely potent regen heal which can heal an entire team to full, even in raids, making them incredibly valuable even off-element.
- In a pinch, Simurgh's, Halloween Maritimus's, Cupid's, and Gold Fafnir's skills can be used, though their healing are burst-only and the total healing is quite a bit lower.
- In a pinch,
Dragon preferences for an adventurer are generally as follows:
- DPS adventurers want Strength or Skill Damage, so that they can dish out more damage.
- preference for Strength or Skill Damage will vary by how much of the adventurer's total DPS comes from skills. An adventurer such as Gala Alex depends on her skills for a large portion of her DPS, so she would want Skill Damage. Conversely, an adventurer such as Pipple doesn't have much Skill Damage (actually he doesn't have any), so he would prefer Strength.
- preference for Strength or Skill Damage will vary by how much of the adventurer's total DPS comes from skills. An adventurer such as
- Buffer units (such as Elisanne) would appreciate Skill Haste Up so that they can set up their buffs faster.
- Healers want HP, which enhances the power of their heals and improves their survivability.
Choosing Weapons[ | ]

Matching Adventurers with Weapons
Weapons should be crafted in consideration to adventurers' weapon types. For example, if using an adventurer that wields daggers, then craft a dagger.
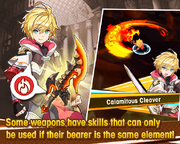
An elemental weapon is denoted by an elemental icon as well as its background being of a color matching its element. The highest grade of core weapons have an element. Void, chimeratech, high dragon and Agito weapons are always elemental weapons. Similar to dragons, elemental weapons equipped with an adventurer of the same elemental type, will grant an additional 50% HP and strength to the weapon's base stats, as well as access to its elementally-locked abilities and/or weapon skill, if any.
- Weapon bonuses will still function regardless of the element of the weapon or adventurer.
- Void abilities will still function regardless of the weapon, as long as the wielder matches the unlocked ability's element.
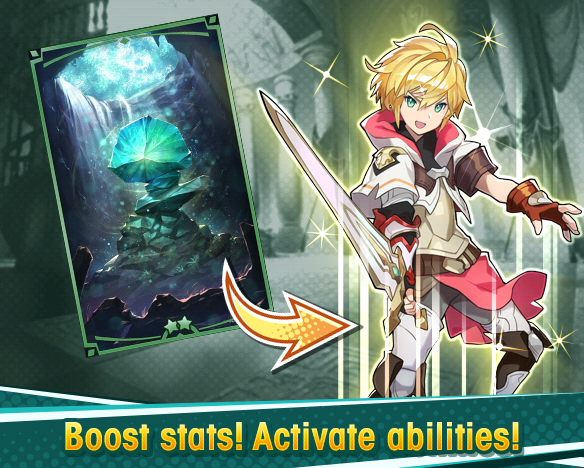
Choosing Wyrmprints[ | ]

Equipping Wyrmprints


Equipping Wyrmprints
Effectively selecting wyrmprints will highly depend on the adventurer's skills and player preference. It is best to analyze the wyrmprint's abilities and determine which adventurers match best with the provided abilities.
- Adventurers who utilize damaging skills will benefit from wyrmprints with Skill Damage Up, Strength Up, Critical Rate Up, Skill Haste Up, or potentially Skill Prep depending on a player's playstyle and quest duration.
- These wyrmprints are usually also suitable for defense debuffers, as debuffers have a tendency to deal a noticable amount of damage (i.e. a hybrid DPS/support).
- Adventurers that can shapeshift frequently tend to also benefit from wyrmprints with Dragon's Claws and Dragon's Skill.
- Adventurers in teams which receive frequent defense buffs, or activate defense buffs themselves, may benefit significantly from Strength Doublebuff and Critical Damage Doublebuff (if having a high critical rate) for offense and Healing Doublebuff for survivability.
- Adventurers who utilize buffing skills will benefit from wyrmprints with Skill Haste Up and Buff Skill Time.
- Healers will usually benefit most from wyrmprints with Recovery Potency Up, HP Up, Defense Up, Shapeshift Prep, Skill Haste Up, Force Charge, and if lacking skill prep, Skill Prep abilities.
- Healers with regen healing will also benefit from Buff Skill Time.
- Healers with regen healing will also benefit from
- AI adventurers may prefer carrying Defense Up or Last Recovery abilities to enhance their survivability.
There are also wyrmprints which have high risk, high reward abilities such as ![]() Endless Waltz's
Endless Waltz's ![]() Full HP = Strength +15%. If a player can maintain the adventurer's HP levels (which may be easier on ranged characters vs. melee, or with regen healing), then the additional stats and damage these abilities provide may pay off. Ultimately, this is all dependent on synergizing with what skills and abilities an adventurer has, as well as playstyle.
Full HP = Strength +15%. If a player can maintain the adventurer's HP levels (which may be easier on ranged characters vs. melee, or with regen healing), then the additional stats and damage these abilities provide may pay off. Ultimately, this is all dependent on synergizing with what skills and abilities an adventurer has, as well as playstyle.
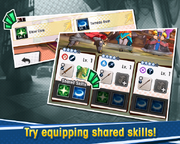
[ | ]

Equipping Shared Skills
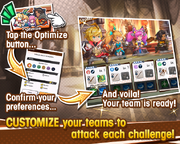
Optimize[ | ]

The Optimize Feature
The Optimize button will automatically create a team based on a few specifications. These specifications include the dominant element desired and an emphasis on offense, defense, or balance. Additionally, there are options to remove adventurers, weapons, etc. from the automated optimization.
The Optimize function focuses on maximizing Might, which may be convenient to unlock quests, but will often give quirky results. For example, the Optimize function will not hesitate to pair wyrmprints that do not benefit the selected adventurer at all due to class locks. Therefore, while this function can be used for convenience, the player is strongly encouraged to evaluate teams created using Optimize to ensure it suits their needs before starting quests.
For best result when mixing multiple elements, hand pick the adventurers first, then choose Optimize for All without adventurers checked. This is most useful when you don't have a matching element healer for your team and still want the Optimize function to choose matching element dragons for all adventurers. Alternatively, choose a single element without adventurers checked for more single dragon element oriented team, even when you don't have powerful adventurers for the same element.
Collection[ | ]
In the Collection menu, the player can see all of their adventurers, weapons, wyrmprints, and dragons in a larger window. Most notably, this is where unwanted dragons can be parted with, in exchange for ![]() Rupies and
Rupies and ![]() Eldwater. Dragons must be unlocked and unequipped before they can be exchanged, and only 50 dragons can be exchanged at once.
Eldwater. Dragons must be unlocked and unequipped before they can be exchanged, and only 50 dragons can be exchanged at once.
If selling a 4 ![]() or higher rarity, unbound, or augmented dragon, a warning message will be shown and you will have to permit the sale of such items at the confirmation window.
or higher rarity, unbound, or augmented dragon, a warning message will be shown and you will have to permit the sale of such items at the confirmation window.
Sell values by rarity are listed below for 0UB items.
- If an item is unbound, the amount of unbinds will be factored into the sale value (e.g. selling a 3UB 5 dragon will have the same value as selling 4 copies of a 5 dragon.)
| Dragon Rarity | Rupies + Eldwater Gained |
|---|---|
| 5 |
|
| 4 |
|
| 3 |
|
| 5 |
|
| 4 |
|
| 3 |
Prior to Version 2.0, it was also possible to sell Wyrmprints:
| Wyrmprint Rarity | Rupies + Eldwater Gained |
|---|---|
| 5 |
|
| 4 |
|
| 3 |
|
| 5 |
|
| 4 |
|
| 3 |
| |||||||||||||||||||||||||||||